Personal Art Blog

Sharing the lessons I teach at the Artist Guild and the personal discoveries in my art.

Thursday, May 30, 2013

Oleanders From Betty


Oleanders From Betty

8x6in  oil on linen $125. SOLD

My friend and fellow artist, Betty Hummer, has these wonderful Oleanders
growing in her back yard and when I went by this morning
she told me to pick some. The purple is a weed which drives her
batty because she cannot get rid of it, but I love the color so included some.
Betty is in her 80's, widowed, battling cancer of spine and lung and by the time
I got there before coming into work, had already washed her floors
the old fashioned way on hands and knees,
and had a bucket full of weeds she had pulled by the door.
She puts most of us to shame with her strong work ethic.
She is an inspiration and I admire her so much.
She is the friend who persuaded me to start teaching.

Artist Note.
The fabulous artist Qiang Huang has endorsed the use of something
similar to what I call my handy tool. I am thrilled.
He is trying the one you can buy. (shaper)
Read what he says about using it
It may make more sense than how I say it.


Posted by Picasa

Tuesday, May 28, 2013

Wisteria Shadows


Wisteria Shadows

6x6in oil on canvas panel $100. SOLD

A friend's house has this wonderful wisteria vine they have trained to
go across their front windows.
It is breathtakingly beautiful when in bloom and the leaves provide shade
after the flowers have gone.

Artist Note
Wisteria is like painting huge lilacs!

Today was the last day of regular classes at the Guild until August.
I give two workshops in June and then I go on vacation
to visit our grandchildren...fun!
Summer starts right now and I will have more time to paint for myself
and that makes me happy, but at the same time I know I will miss all the
other artists. So to compensate I host an "open studio" all of July and the
guild members are free to come and paint with me four days a week...lots of fun!


Posted by Picasa

Sunday, May 26, 2013

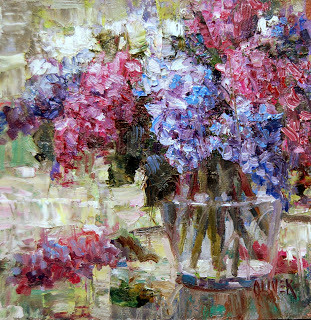
Lilac Bouquet


Lilac Bouquet

6x6in  oil on canvas panel   $100.

Beautiful lilacs delivered by a traveling friend.
All she requested was to watch me paint them.

Memorial Day tomorrow.
Honoring the fallen Military is a genuine privilege . At 3:PM we will
take a moment to remember... with gratitude.
One of our sons was in the military here in the USA and the pride is still felt.

Growing up in England I remember we had a similar day called
Remembrance Day...or Poppy Day, and we all wore a red silk poppy.
It was in November. I copied the info below
During the First World War, on the 11th hour of the 11th day of the 11th month in 1918, the guns of the Western Front fell silent after more than four years of continuous warfare. In many parts of the world, people observe a two-minute of silence at 11am on 11 November. 

Thursday, May 23, 2013

Rose for the Fundraiser


Rose and Brass

6x6in oil on canvas  starting bid  will be $50.

SOLD for $129 - thank you.

Daily Paintworks is holding an auction for the Oklahoma Tornado Victims .
If you are interested in this good cause then please follow the link.
If you do not like this one then please take a look at the many, many other works of art
being donated. Thank you.


Posted by Picasa

Monday, May 20, 2013

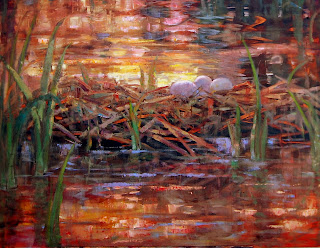
Avian Architecture - Demo at Gallery


Mockingbird Nest with Five Eggs

11x14 oil on canvas panel  $650.. (unframed) SOLD

This is one of my favorite nests. I love the long twigs mixed in with
the inner lining of fine grasses and other bits of fillers from the earth.

Artist Note.
I did this demonstration piece at the gallery last Saturday. I finished it today.
I am always nervous doing a demo, but I had a group of supportive artists
mixed in with the crowd and I settled down pretty quickly.
The images are blurry for which I apologize.
.
I started with broad washes of Transparent Oxide Brown, Red and Yellow.
Following up with some  Ultramarine Blue

Below you can see where I start to form the shape of the nest by
lifting off areas and placing some opaque light shapes using opposing strokes
with a half inch angle brush. I am careful to keep my really dark areas
transparent, and finally placing the eggs in the general area I want them.


BRUSHWORK
When painting something with as many twigs as this I use a
long script or liner brush. Different marks can be made
with the different positions shown below.


Holding the brush at the end and more parallel to the canvas.
I can go right to left as well as left to right, with short strokes.
The brush fans out a bit and creates a slightly uneven line
which is perfect for what I want. Next one is for a thick or thin mark.

Holding the brush lightly at the very end of the handle
I can do fast downward curves as well as straight lines.
I use the tip to middle of brush at first ( lightly) then add  more
pressure to thicken the mark. This prevents the too perfect line

This is the control position. Holding the brush closer the front
I can do the calligraphy I want. I have my paint soupy,
but not runny.


Fortunately this image is a bit clearer. I have lifted out the
white lines with a pointed shaper and the twigs are in
different grays and darks. Below shows texture in the
background done with some Fracturing with handy tool and knife.
I am painting the eggs so am holding the brush in the control position.


Nest is gradually
building up and
look-see...the beauty of a real nest!


Posted by Picasa


Thursday, May 16, 2013

Mr Beaver at Home


Mr Beaver at Home
6x8in oil on canvas NFS

I was invited to join a small group of artists who
participate together in a monthly challenge.


The DB Challenge
They are:
Diana Moses Botkin    http://dianamosesbotkin.blogspot.com/
Suzanne Berry              http://suzanneberry.blogspot.com/
Vicki Ross                   http://vickiandrandyrossart.blogspot.com/
All are fabulous artists and I felt honored to be asked.

The guidelines  - It should be FUN!
But Diana also wrote, it should be a chance to play, explore and learn something
without the thought of marketability of the painting pleasing anyone but
ourselves. That drew me in.

I admit I laughed when I read the challenge for my first month.
So will you... it is  "Rodents."
Anyone who has been following my blog knows I have
just completed a series of bird nests so is it any wonder
my rodent of choice has a huge nest. Tree branches and
trunks replace twigs and grasses.
This was from a photo I took in Colorado near Lake Dillon.

Below are the other member's paintings.
Some really skillful and creative imagery going on here.
I am hoping being in their company will
challenge me to come up with some creative results myself.
I encourage you to look at their excellent blogs.


“Of Mice and Lego Men"
Oil on hardboard, 5"x7"
©2013 Diana Moses Botkin


"Pink Squirrel"
16" x 12" pastel


"Really?"
12"x16" Oil on linen
©2013 Suzanne Berry  


Wednesday, May 15, 2013

Avian Architecture - The One That Got Away!


Sandhill Crane Nest
Oil on Canvas 48x36in
This is the large painting for my show which did not
make it.

Artist Note.
I know there are other artist who go through this ordeal
 - this is for them!


A bit about the real nest first.
This is a marvelous type of nest. The old reeds are pulled
and bent over to form the base bringing it gradually
up over the water level. This clears an area around it.
The new reeds come up through and around
the nest providing shelter. The nest the
ranger showed me did not have eggs so I researched
and found out they plop two or three eggs right on top.


Here is my struggle and how I unfortunately kept making changes...

The first stage completed below.
The idea was to let the paint dry then make subtle color changes.


I managed to use the fracturing technique and used
proportionally larger tools than normal for this
enormous canvas...remember I work daily on 8x6in.
When I left this to go to bed I remember thinking
of the small adjustments it needed and was quite satisfied.

THEN, in bed, the dreaded, critical brain started...

It is such a dark painting - why not place more light through the
reeds? Of course - this was a great idea and I got excited.
Up at 4:30 in the morning and started to
make the change below.


Then I saw the nest went all the way across and decided
it needed to change from this below


To this.


Then I started looking at the way the reeds hit the water.
They were like a giant scallion - whitish base with
many green fronds coming out of it. On the one below
several seemed to line up too much in a line.


So following my traitor of a mind, I made corrections.


Making each of these changes I found I was getting tighter
and tighter also making numerous little adjustments.
Two eggs not three.
Color changes
Each frond of the reeds started to get painted. Look at the first
attempt at how the reeds were suggested to the final one.
I was refining way too much - ending up with a painting
painted in a manner I did NOT want to paint in.
Does that make sense to you? Can you relate?
Every time I saw it I would make another change, and by
now all the fracturing technique and vibrant color had
disappeared. I knew I had to do something drastic to stop
keep trying to save it. So I put my razor through it.
A great big cut from corner to corner and with gritted teeth
I pulled that sucker apart and felt so much better after
doing it. Now I was free to start a new one.


Several valuable things I learned from this.
I was painting with a deadline for a show - never good!
I was trying to save a 40 buckaroos canvas - never good!
I did NOT do my usual mission sheet - never good!
I listened to a critique from someone who likes
photographic realism rather than impressionism. - not good.
(they LOVED the end result)
I fiddled with it way too much. NEVER EVER GOOD!
This one is the most important
I should always have some sense of "liking" a painting I have done.

My next one, same size, I like much better. I managed to keep
some of my fracturing style in it. This time I did my homework
and did my mission statement. I stopped allowing my mind
to think about it in bed.
It was finished in a quarter of the time the other one took. This time
I sent images to my daughter who is absolutely the  best at critiquing my work.
I am bummed about the grainy quality as my camera is in the shop
and this was my best shot with phone. Either I was too far away
because of the size or the lens must have had a film on it.
I will take another one when I get my Nikon back.


Posted by Picasa

Sunday, May 12, 2013

Avian Architecture - The Start, plus framing Info.


Mocking Bird Nest

24x18in  oil on canvas  SOLD

This nest was the one which started the series.
I adore this nest and it is still one of my favorites.
When I started I knew I wanted a contemporary presentation.
I had no idea it would turn into three years of exploring
different viewpoints and media.
I did the three paintings below using the same type
of background. I love the way the dark markings turned
out, and feel they added a richness without being fussy.

Artist Note.
I first made a textured layer of heavy gesso on the canvas
using a large palette knife. A transparent wash of color
went over it before adding the dark transparent marks.


I had several of my work sheets
hanging near the paintings.
Artists usually enjoy
reading these.


Next part is about framing the small paintings.

MY Quandary...
How to frame the small paintings for the show.
I spent a lot of time thinking how to make my regular
small paintings look significantly worth more than what
I sell them for on my blog. The gallery has to
make their commission which I heartily endorse so
I came up with a wonderful frame on which
I which received fabulous feedback.


Blurry I know, but you should be able to get the idea.
I usually paint on canvas panels so first of all I painted
the edges and then they were
glued to a suede backing with a beautiful and
perfect Italian molding. Simple and expensive looking.
and just right for the birds nests.
They were not cheap for sure, but value was easily perceived
because of the increased size and good quality.
I had ten in the show and four more were ordered.

I got the idea for gluing them on TOP of the suede
from doing it in my own little gallery.
I love to paint the small daily paintings to the edge
and hate how much is cut off with a frame
so this is what I often do.


Take a 6x6in
plein air frame

$11. on sale at Jerry's
YES
ONLY
$11.!!!!


Use a glue-gun to
attach the painting
panel
on FRONT of frame
With the edges painted
it looks really great.
Even better is an
8x8in canvas panel.
on top.
Trust me on this.

A friend brought in the nest I have shown above, last week.
It is an abandoned Finch nest made with various dryer lint.
It is a lovely little thing. You would think I would be fed up
of nests by now but I really enjoyed painting it. It is a keeper!

My main camera broke before the show so many of the images
are not really good, but you can see more of the show's paintings
HERE if you are interested.
Please excuse the website -  is not finished yet.
Not enough time...sigh.

Will have to show you the large disaster painting next. Oh Boy!


Posted by Picasa

Thursday, May 9, 2013

Magnolia Tree Nest


Magnolia Tree Nest

16x20in  oil on canvas   SOLD

The gallery told me that this painting could have sold several
times over. There is usually at least one painting with popular
appeal.  The nest is in my daughter's back yard and when I
first saw it the tree was dormant. We had no idea that it
would be so gorgeous a couple of weeks later.

Artist Note.

I thought I would share my process on this painting. It was quite difficult.
I hate anyone to think that I can produce paintings without any problems.
It is usually the middle of the painting where it becomes tough for me.
In this painting the dilemma became ...nest or flower in the focal area?
I did some sketches like I always do. Sorry the images are poor.


I decided to move the flowers so they would link to the nest.
I have never painted tulip magnolias before - especially in
a tree where it appears there are hundreds of them.
I had to place and group them so they would not
appear "spotty." In the shot below you can see my first attempt.
I had two areas which fought each other.


then my second attempt...it got even worse.


(Another poor image for the color)
The flowers became too dominant, especially the open one.
I added green leaves and laughed when I stepped back and
saw the bright white flower. Off with its head! I scraped it down
and painted it again with better values. Remember - white in 
the shadows is a similar value to black in the light.
Then I painted a flower bud in front of it. This was an opportunity
for layering (depth) and better linkage of the different values around it.
The nest was still too separate so I thickened the tree branch
in the front of the nest, and added another branch from that one.
Then I made the buds open up a bit in front of the nest and
started to refine all the areas - especially the nest and the texture
of the tree. I did a lot of negative painting for the
background creating the thinner branches.
Hard work for the brain, but the pleasure of trying to solve the problems
is what brings me satisfaction and I forget the stage where I want to
put a razor blade through it. Speaking of that. Guess what? I do not know if
you remember the 48x36 (way back) I was having problems with?
It was the main reason I had to stop blogging for a while.
Well, I ended up putting the razor to it to stop me from
trying to save it. I will be showing that whole process in another post.

Tuesday, May 7, 2013

Avian Architecture - watercolor


Nest

6x8in  watercolor on moleskin book paper SOLD

Whenever I do a series I venture into various media to explore
different effects.  Here are a few of the watercolors I did.

Artist Note


The one above was the first of the watercolor sketches I did of the nests
I was experimenting with the fracturing technique using

the basic warm and cool colors. Ultramarine Blue and Burnt Sienna.
Next came the one below - this time with less blue.
I dry brushed the really dark areas.


Nest in Tree  7 x 9   moleskin book paper  SOLD

The one below is a watercolor of a cactus wren's nest
on YES multi media canvas. I added some ochre and pale yellow
 to the palette and was careful not to use a staining color.
I found it easier to fracture in watercolor on the canvas than the paper.
I painted a dark shape for the nest and lifted out the shapes for
light nest material. I actually placed the wren in this one.
 My computer is acting weird and I keep
trying to download some of the others, but it is not working
going to have to let this be the last one.
Tomorrow I will show some of the others from the show.

Cactus Wren Nest   8x8  Yes canvas SOLD                                                                                                          

Sunday, May 5, 2013

Avian Architecture


Windblown

9x12in  egg tempera   For sale through the gallery*

Phew - it is over. Life will resume its normal flow.
First, I need to thank some people.
I had a wonderful friend drive 500 miles RT to come and
take care of the meals for several days. Her name is Pam Cox
and she deserves a friendship gold medal!
She happens to be a gourmet cook so good food
was plentiful. Thank you very much, Pam.
Another friend made me some fabulous postcards with images on them
to hand out. This was managed during a difficult time for her.
A big thank you to Marjorie Van Dormolen.
Lindy Bridgers made 4 dozen nests from chocolate covered rice noodles
and popped a little candy egg in the center. What a wonderful friend.
Lisa Kubiak gave me a gorgeous necklace made by a local artist of a
silver nest with three pearls. Perfect for the opening and lots of
admiring comments were given. Thank you Lisa.
My wonderful daughter who gave me valuable critiques drove in
as did son #1 and my darling goddaughter.
A huge thank you of course to Gail, Mark and Max at the gallery. They
had wonderful refreshments and champagne. The show was hung beautifully.
They kept their cool right up to the last minute delivery of
a huge wet painting. Great people.

Thursday, May 2nd was my opening reception.
The invitation was large at  6x8in  (first class postage!)
I used the photo (below) of some of my nests and you can see a
couple of my paintings - in both the top corners.
I did a large ard so it would get noticed between the junk mail.


Artist Note

I had no idea how the public would react to a show strictly on bird nests,
but it turned out that it was a very popular theme.
The show was a collection from three years of painting these amazing
avian structures, strictly for personal pleasure. I enjoy building them
with paint the way the birds do using different materials. It is a puzzle
why I respond to nests so emotionally, but I truly do. I can clearly remember
trying to draw one I could see from the window when I was about 6.
The bird was not as fascinating as the nest and it is still the same today.

Some of my first paintings on this blog were several
of the nests included in the show.
Below are a few wonderful nests from my collection - the one in the
painting above them is a Sandhill Crane Nest. 48x36in


Tomorrow I will show some of the watercolors I did.

My last thank you is for my supportive group of blogging friends.
I have missed you and I am looking forward to trolling
to see what you all have been up to.

*M Phillips Gallery phone number
575-525-1367